Saturday, July 31, 2010

Canadian Saver Wants To Know...

 Here are the grapes last year, still on the vine and ready to harvest .
In a comment added to last week’s post Canadian Saver said...
“I may need to ask for your jam recipe as we have grapes too, 1 really big vine and many transplants that will start producing lots.”

Well here on the Witch’s Island we love to share recipes!

Last year on Rib Fest Day we harvested our entire crop of grapes (at least all the ones that the birds had left for us) and turned them into the best jelly we’ve ever made. We posted some pictures of the crop and the resulting jars of jelly in a post titled Vacation is over, RATS!!!!! We didn’t, unfortunately, weigh or measure the amount of fruit that we actually harvested but you can see from this picture approximately how many grapes we are talking about.

After cleaning, this is how many grapes were left by the birds for us.

Before you start making the jelly you should have your jars and lids washed and sterilized. For this recipe we used 8 250ml and 2 500ml jars. Results may vary...

The first thing we did after we brought in the grapes was to wash them and remove as many of the stems and leaves that we could. We did this gently so as not to break open any of the grapes and lose the juice. Next, we put the cleaned grapes into an enamelware corn pot and crushed them with a potato masher. We then added 2 cups of water and brought the mixture to a boil, stirring constantly to prevent burning. We kept it boiling for 5 minutes and then strained the liquid through a colander with very small openings into a large bowl. The colander we have was very effective at straining out the pieces of skin and the seeds but yours might not be as good. We tried doing this part with cheesecloth in other years but we found that it was awkward to work with and it absorbed too much of the juice. It was so much easier to drain the boiling hot liquid through the colander; no burned fingers!

We let the boiled fruit drain into the bowl for an hour or so, poking and prodding it every so often to force as much of the juice through as possible. The left-over solids were then dumped on the compost pile. We ended up with 10 cups of very purple grape juice.

Next we poured the juice back into the corn pot and brought it back to a boil, stirring often. Then we added 7 1/2 cups of sugar (we like our jelly tart, you might want to add a little extra sugar if you like things sweet) and boiled the mixture for about 7 minutes. Then we added 1/4 cup of lemon juice and continued boiling for about 3 minutes. When we reached the jelly stage (checked by the frozen plate method) we poured the liquid into the hot sterilized jars and we were done!

Look at all that grape-y goodness! You know it won’t last long!
The grape jelly is left to cool before storage.
I hope this works out as well for you as it did for us!

Sunday, July 25, 2010

Potting Shed Tour, Enjoy the ride.

Years ago in a far away land the Witch was dreaming of a perfect garden shed or outbuilding to store all of her gardening goodies. After much searching she found a picture and some plans but it wasn’t quite right. So Hubby came up with some ideas to make it perfect.

This is the shed we fell in love with. Ours is modification but you can still see the bones of this design in it.
This is the picture which inspired us. It’s from a Reader’s Digest book called "Dream Backyards" but we also found full construction plans in the July/August 2003 edition of “The Family Handyman” magazine.
“Ultimate Garden Shed.
This 8 ft. x 9-1/2 ft. storage area has loads of room for your lawn and garden equipment, while the smaller front room makes the ideal potting shed. The floor is built using heavy timbers and large cement pavers. The structure also uses cost-effective barn sash windows, board-and-batten siding and metal roofing.”
is how the building is described in “Dream Backyards”.

So, three years ago we spent quite some time in the spring making and adjusting plans for our own version of this cute little building and it became Hubby’s building project for his summer vacation. It was a good experience for him and he spent quite a lot of time mooning over it much like he is doing now with the gazebo.

The Witch’s Potting Shed
The first thing you have to know about the potting shed is that it has two completely separate rooms, there’s no connection between them. That’s good because I like to keep my side neat and orderly and Hubby, well, not so much so.

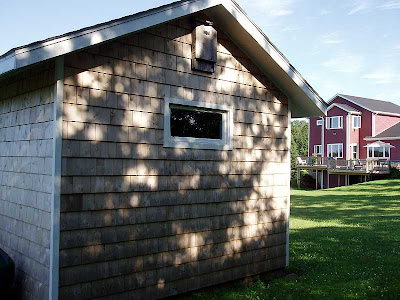
Hubby’s side is very utilitarian. He uses it to store his lawn tractor, the winter tires, the grass-whipper, the snow blower and some other stuff. The place is pretty jammed; I don’t know how he works in there.

The back side of the shed where Hubby stores his rotiller and wheelbarrow because he can’t cram anything else in his side.
The bat box above Hubby’s window was graciously returned to us by the folks who bought our old house.
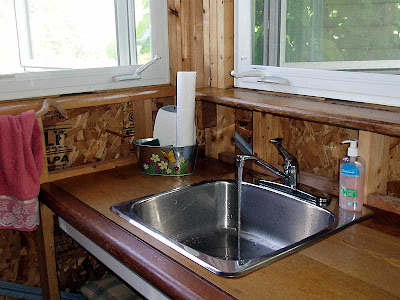
My side has a sink and running water to wash the dirt from the veggies and just to clean-up. The sink was purchased for $10 at our local ReStore which sells used building materials to fund Habitat for Humanity building projects. The water comes from the house via a buried garden hose which then goes on to supply the gardens at the back of the yard. My side also has a solar powered light but it doesn’t get used too much. How often are you going to be potting plants after dark?

The sink in the potting shed is great for washing muddy hands and veggies so that the dirt doesn’t make it into the house.
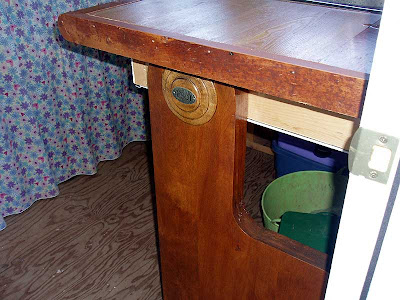
The wood we used for the countertops and upright is from a church pew we bought years ago. We cut it down from its original length of 15 feet to a more reasonable 5 feet and made a nice bench for our front entry but then we had all this beautiful old wood left over. This was a great way to use it up and it suits the space so perfectly.

The upright for the sink counter is the end cap from an old church pew. You can still see the row marker if you look closely.
I made all the curtains myself to hide the junk under the counter. Yes the Witch has junk but it is all well organized. It looks so much tidier to have all the bags of soil and dirty flowerpots neatly tucked away behind the curtain.

I like to keep my side nice and neat. A place for everything and everything in its place.
As you can see all my garden tools have their own space. Most of the canisters were purchased at yard sales along with the hanging black rack, which I use to dry my herbs. The bookrack is the hymnal holder from the back of the church pew.

This old pot rack is great for hanging herbs to dry out.
We keep our reference material close at hand.
This is a great place to store all my garden tools so that they are protected from the weather but still just a few feet from the garden.
The shed has 3 nice sized windows which were the single most expensive items we bought for this project. Hubby tried building his own copies of the ones in the plans from old window sashes but they leaked. He had to replace them with these nice vinyl ones the next year. Anyway, they are perfect for looking out over the garden and the back of our house. They also give me a great view of the gazebo.

This is a nice cool place to watch Hubby slaving away in the hot sun on the gazebo roof.
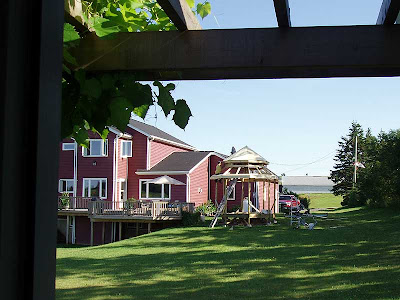
The Witch on the front door is one I made. I used to work in a craft shop while I was earning my engineering certificate and I made dozens of these while I was there. I also painted the design on the floor but it got too tedious to continue it all throughout. The grape vines growing up and over the arbor have some history for me, too. We brought them from our first house when we moved and they are doing great in their new spot. Last year they provided just enough fruit to make a nice batch of jam. The grapes are too tart to eat right off the vine but the Waxwings love them and they’ll strip them clean if we’re not paying attention. They just have to learn to share.

The Spells witch welcomes me to the Potting Shed.
This design was supposed to cover the entire floor but I never got it finished.
The grapevines love having the arbor to climb on.
The potting shed was a great project and we use it almost daily at this time of year. Hope you have enjoyed your little trip through the best garden shed ever.

Thursday, July 22, 2010

Maybe You Need To Re-Think That...

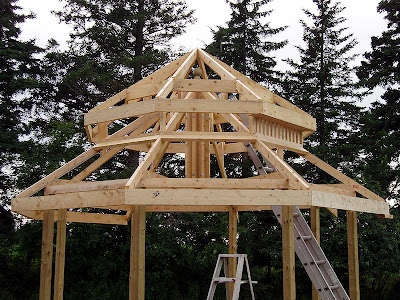
The gazebo roof is finally starting to take shape with the addition of some sheathing on the upper roof and some vent spindles this week. It has been a long time coming because there was a major change in the design of that section of the roof.

These are some of the new tail pieces he made to lengthen the upper roof.
In a previous post there is a picture of Hubby gazing up at the underside of newly erected roof trusses and I joked that he was congratulating himself on a job well done. It turns out that he was taking notice of something that I had seen a couple of days before, namely that the secondary roof was way too small. “It looks like a spaceship has landed on our gazebo!” he said by way of illustrating his concern and I had to agree. Maybe I should have told him that I had noticed the same thing earlier while the whole structure was still on the ground but he did seem so pleased with it that I didn’t want to hurt his feelings by criticizing.

So the question was what to do about it. He really didn’t want to disassemble the whole upper roof and then try to haul a much bigger piece back up in the air so he decided to just add on new tail pieces to the ends of the rafters. It sounds easy but it was very time consuming. It was worth the trouble though; the new shape suits the size of the building much better.

The upper eaves and some of the vent spindles have been added.

This week he has started adding eaves and soffits on the upper roof. He has also put in some of the spindles which cover the vent space between the two roofs. There is even some plywood installed on the upper roof which can only mean that shingling will begin soon! Let’s hope so because he is back to work next week so he won’t have as much time to build every day. There’s only so much summer left!

A closer look at the upper vent.

Finally, Hubby has started to add the sheathing to the upper roof.

Monday, July 19, 2010

Barney Towels

This week I convinced my boss that he could give me Friday off from accumulated overtime without the business coming to a complete standstill so I’ve been enjoying a beautiful long weekend. We took a trip across to the far distant land and had a great day of shopping and eating. We had breakfast at a truck stop on the way over and they gave us so much food that we could have easily shared one plate. We both kind of waddled back to the truck when we were done. Thankfully we had an hour or so to digest on the drive in before the serious work of shopping began.

Although there was a lot of fog early in the morning it still turned out to be a beautiful day.
We started off at the building centre where Hubby went hunting for a finial for the top of the king-post in the gazebo. He hadn’t been able to find one of the right size at home but he came up with the perfect one right away, so he was happy. Then it was off to Costco where I got some new t-shirts for myself and a few other things. After that we went to Homesense where I bought some new towels in a bright purple colour. The salesclerk who was ringing in the purchase said something about the colour looking like Barney the dinosaur and Hubby quipped back that he would never be able to look at the towels again without thinking about what she had said. The poor girl, she took him seriously and got all worried that she had insulted us. We spent 5 minutes trying to convince her that he had been joking with her but I’m not sure she believed us. Anyway, my new towels are much more “aubergine” than “Barney”.

Hubby's new finial installed at the top of the king-post.
Barney is no where near the colour of my new towels!

After that I went to the Value Village while Hubby toured around the Future shop. I got myself a great pair of denim shorts but he came back empty-handed. Princess Auto and the pawn shop were next but there was nothing we wanted there. So it was off to the big mall where we sped around all 130+ stores in about half an hour. The only reason that I was in there any longer was that Hubby convinced me that I should take the opportunity to get my hair cut. Mastercuts had an opening so I took it and $50 and 20 minutes later I had a new ‘do. On my way out of the mall I bought a new quilted wall hanging to replace the snowman one that has been on the wall in the family room for the last 8 months and then went to collect Hubby from Chapters where he had been waiting out the make-over.

I sure had fun gathering up this pile of treasures.
At that point it was time for supper at my favourite Chinese restaurant where we had our favourite dinner; the Schezuan Combo. Mmmm... My mouth is watering just remembering; I didn’t slobber on your monitor just now, did I? At the end of supper, as I was reading my fortune cookie message which said that I should be open to new ideas, Hubby said that he would like us to go to the new casino before going home. Well, what could I say but okay. We agreed that we would spend up to $20 and then quit. We actually spent $25 but we had a great time buzzing from one machine to another and we were there for over an hour and a half. We both agreed that that was enough and if we were to stay any longer it would likely become boring. It was fun while we were there, though!

On Saturday, Hubby worked away most of the day on the gazebo. He spent hours redesigning the secondary roof because he thought the first design looked too much like a space ship had landed on top. I’m glad too because I was thinking this all along but I didn’t want to hurt his feelings by saying so. I spent my day going from nursery to nursery looking for some last minute bargains to fill out the few bare spots left in the veggie garden. I’m glad I went too because I found some awesome yard sales that I didn’t know were on. I got a great old enamelware pot for cooking mussels or clams that will double as a witch’s cauldron at Halowe’en, some beach glass earrings and a few other baubles. I had to go around one place three times before I was sure I had seen it all! Did I mention that I love yard sales? We had BBQ’d hamburgers and fresh beets and carrots for supper. The garden is doing great this year and this may be the earliest we have ever harvested beets. They were very tasty and I had a big helping of greens to go with them. The tomatoes, cucumbers and the gourds are doing great, too as you can see in the pictures. We ended the day with a huge fire in my outdoor fireplace and toasted up a few marshmallows before going inside.

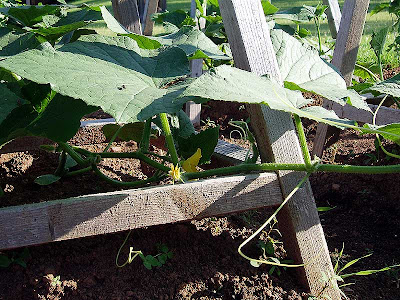
The cucumbers are going great under their obelisks this year and are already starting to climb.
A close-up view of the cucumbers already in blossom.
We're going to have another bumper crop of tomatoes this year.
These veggies were young and tender and made a great dinner.
We finished the day with a roaring bonfire and some toasted marshmallows.

On Sunday we declared a moratorium on the usual housework because it was going be just a scorching day. Hubby cut the grass while the temperature was still relatively cool and I made a nice lunch and did a bit of laundry and then it was off to the beach! It was a perfect day at the shore; the water was warm and clear (although there were a few too many jelly fish) and we found a nice secluded section of sand to lie out under the umbrella. Hubby got to swim on and off all afternoon and he even convinced me to wade in a couple of times. Of course, as soon as I got in up to my waist I noticed two crabs edging over on the sandy bottom to get my toes so my swim only lasted a few minutes. It was refreshing while I was in there though. Dinner was BBQ’d spareribs with more of those beets and carrots. The weekend finished up with a glass of wine out on the front porch looking at the moon and stars.
I can see more long weekends coming up soon.

Wednesday, July 14, 2010

Gazebo Roof Update

It’s been a while since I have mentioned the gazebo but frankly not much was happening with it. The last few days have seen some good progress, though. Hubby got the roof system designed and built. He even got it up to the top of the posts without killing himself! I’m glad I was at work while this was going on because I would have worried myself silly.

Anyway, he took a bunch of pictures of the process and I thought you might like to see them. So here they are.

Hubby decided that the easiest way to build the roof would be to do it down on the floor of the gazebo and then dissemble most of it and just lift up the minimal amount that would be needed to put the king-post up in the air. This turned out to be a good decision because it took a couple of tries to get the right dimensions and angles for those main trusses.

The main roof trusses being built.
Apparently the top surface of a roof truss is a good place to do your calculating. I’m sure that Einstein made fewer notes as he was developing his theory of general relativity. This will all be hidden once the roof goes on but it will be there for posterity.

Einstein probably made fewer calculations postulating General Relativity!

This is the start of the secondary roof which will cover the upper vents. Hopefully, these vents will allow the heat to escape on those hot summer days. This little roof took about three days to come out of the design stage. Hubby first thought that it should have its own little king-post and spent HOURS cutting samples and test pieces only to abandon the whole plan. Eventually he chose to just attach them all at the peak and this seems to have worked out fine.

The start of the secondary trusses.
This is the entire roof truss structure completed. At this point it was ready to be disassembled and moved up to the top of the posts. You can see some of the straps that he was using to cinch in the trusses to the king-post. They were just temporary and were removed later.

The secondary trusses are done.
The king-post has been trimmed and finished out and the first of the main trusses has been bolted on. He had decided that four trusses and the king-post would be enough structure to keep things from collapsing but still be light enough to lift by himself.

Rebuilding for the big lift.
This is the main roof ready to be lifted to the top of the posts. A little bit of bracing and he was ready for the big lift!

The roof is ready to go up.
The lift was planned to go up in four steps each of which would only require one side to go up about four feet. He added some temporary boards to the post to catch the tails of the trusses so that he could lever the opposite side.

The first of four lifts.
The halfway point and there were no dead bodies or blood anywhere. Apparently it was going to work out as planned!

The second step.
Only one more step to go. It was a little tricky for the last two steps because they had to be done from the top of the ladder.

Almost done.
Made It! Yeah!

Now that it is up there we are getting a better feel for the scale of this thing and we think that is going to be just perfect but, boy, is it tall!

Holy Crap! He actually got it up there without killing himself!
Hubby took a little break after getting most of the remaining lower roof trusses reattached. The day was just blazing hot, well into the 90’s.

Most of the main trusses have been reattached.
Break time was over, and it was back to work. Here he was reattaching the secondary trusses and that required the extension ladder. We are still “discussing” whether he will need to rent staging to complete the roof.

The secondary trusses are being reattached.
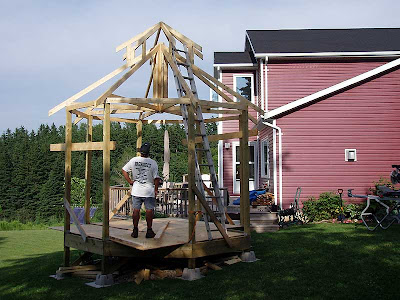
It was late in the day when he got it all done and I think he was pretty pleased with himself. After I got home from work he spent about an hour circling the building going “ooh” and “ahh”. Here he is gazing lovingly at his creation. That’s my little carpenter!

My little carpenter surveying all his work.
Now that it is up in the air you really see how complicated that whole part is. No wonder there were so many calculations earlier on. Hey Hubby! Is it too late to add some sky lights?

That’s a lot of cutting!
There were all these little pieces of off-cut two-by-fours lying around so I decided that the best way to clean them up was to have a bonfire in my fire pit. It was just blazing for over an hour. What a productive day!

The best way to get rid of your wood scraps.

Saturday, July 10, 2010

Scrub Pads and Shopping Bags.

It’s the time of year now where we are really starting to enjoy the gardens, especially the flower gardens. Everything is starting to blossom and I can hardly wait to harvest some to bring the beauty inside. I try to arrange a new bouquet in my ikebana every few days. This one is a little different though, can you see why?

The lily garden is almost ready to blossom.

Can you see the scrubbies and the shopping bag?

Growing amongst my flowers are a pair of scrubbies and a shopping bag! They are there in the middle, just above the bright orange lily. The shopping bag is in the big purple rose and the white flower to its left and the purple flower to its right are the scrub pads. The scrubbies were handmade and so beautiful that it is such a shame to use them but I can’t wait to try. The friend who sent them made them herself and it doesn’t sound like it was much fun. This is the way she described it in an email she sent;
“Two years ago when we were in Mexico and I had that horrible fall, I was really stuck spending a lot of time in my room. An older Canadian tourist from Vancouver had given me a couple of the scubbies and I thought they were really cute. She knew how bored I was and told me she'd show me how to make them. I've done a bit of crocheting during the years and figured it would not only be fun but a great idea for our church bazaar. FUN???????????? It was NOT!!! I had no clue how involved this was going to be. They sure looked simple enough. I figured she used some special kind of yarn. I couldn't believe what you had to do. First you had to buy material that looks like the crinolines I used to wear when I was a teenager. It comes in all different colours and is fairly stiff. You have to get about 3 metres of it and then cut it all up in narrow strips. Well it AIN'T that easy because if you visualize it, the edges are all jagged when you cut it so when you try to fold up the strips they are all sharp and when you take a strip and try to crochet with it, it's such a treat. The edges stick to your clothes or the chesterfield or whatever it can. Forget trying to keep nail polish on your nails. Then periodically you have to tie another strip on. Not only does it prickle you wherever it touches but the strength it takes in your hands and fingers to try to make it loop means you're lucky to make one of those things a day and if on top of that you happen to have arthritic fingers, boy in the morning you can sure feel it. Once you get the circles made you then have to crochet them together but try to stuff them as you go along.”

I don’t think that I’m going to be making any of these myself any time soon!

This is the note that came with the scrub pads.

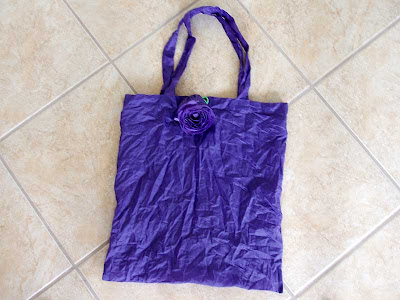
The purple rose shopping bag is so cool, too. While it is not homemade it is very light and it has a clip on the side so that it can be attached to a purse strap or a belt loop. I’ll never have to worry about having a shopping bag with me again.

This is the rose bag all tucked away.

This is the rose bag fully extended.


These little gifts came as a complete surprise and they brightened my day more than words can say. Sometimes the simplest act of kindness will stand out and you will remember the moment for a lifetime. I guess I’m having one of these moments and wanted you all to experience it with me. Hope you have enjoyed the ride.